Water pools around your toilet base are not only unsightly, but it’s also potentially dangerous. Besides, wasted water often leads to increased water bills.
The good news is that there’s a straightforward solution to the problem.
If the water leaks from the tank bolt, you have to tighten or replace the bolts as per their condition. However, as the leakage may be due to rusty or cracked bolts, you must replace them before damaging the water tank.
What are tank bolts?
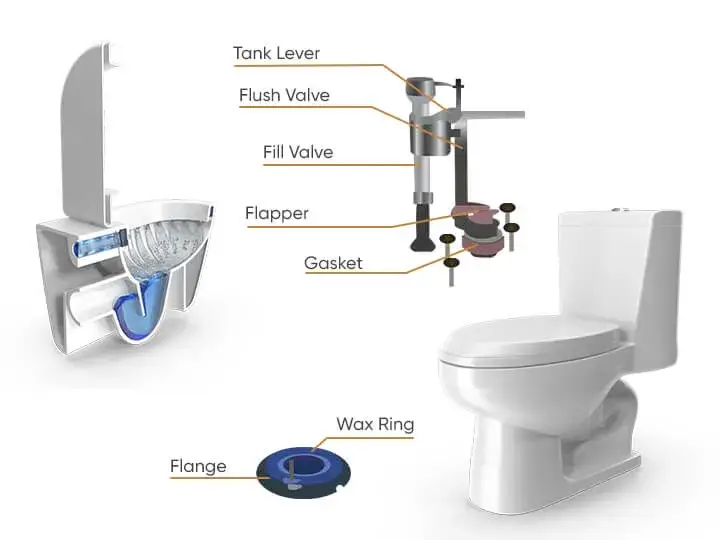
Tank bolts are the bolts that join the toilet tank to the bowl. They are usually installed with rubber washers inside the tank to avoid leaking. There is the possibility of the bolts getting loose, corroded, or worn out with time.
And this leads to a leaking toilet tank.
The chances of the bolts corroding or getting worn out are even higher if the water is hard.
However, it’s not always that you need to replace the tank bolts.
Sometimes the leakage may be due to loose bolts. In this case, you will only have to tighten the bolts and straighten the wobbly toilet tank.
Common causes for leakage from tank bolts
There are four common reasons for a toilet to leak from the tank bolts. It may be because of:
- Misaligned bolts because of a poor installation. All it takes are a gap or two to lead to leakage. That’s why it’s better to have a professional properly install the tank top.
- Cracked or entirely damaged bolts. In this case, there’s no other option but to replace the bolts with new ones.
- Rusty bolts because the bolts are made of metal and because there’s always water in bathrooms.
- Bolts screwed on too tightly. Once again, this is due to a poor installation done by someone inexperienced.
Now that you know why your toilet is leaking from the tank bolts, let’s see what you can do about it.

Fixing loose bolts
Sometimes the tank bolts may just be loose and need a slight tightening to stop the leakage. In this case, all you have to do is
- Tighten the tank bolts. You can do it using an adjustable wrench. And about where the bolts are, you can find them under the bowl.
- There is a chance that the bolts keep spinning, making it difficult for you to loosen them. If this happens, you can try accessing them from inside the tank.
- In this case, you have to first empty the tank by turning off the water valve. Most bathrooms have it behind the toilet.
- You next have to flush once to empty the water in the tank. Then lift and place the toilet tank lid somewhere safe where it won’t fall or crack.
- Using a screwdriver, use one hand to hold the bolt’s head inside the tank. Then tighten the outer nut found under the bowl, using your other hand.
- Now that the bolt is tightened, check to see if the leakage has stopped.
- If it has, then there’s nothing more you need to do. The problem has been solved!
- However, you will have to replace the bolts if there is still some leaking.
Replacing the tank bolts
You need to follow these steps to replace the tank bolts:
Empty the toilet tank
Follow the steps mentioned above to stop the water supply, and empty the water tank.
Remove the tank bolts
Next, use a wrench to remove the nuts which connect the tank to the toilet bowl. If the bolts are rusty, then the wrench won’t help in removing them. You instead need to use pliers to grab the nut or bolt head to loosen it firmly.
Tapping the nut with the end of the pliers also releases the rust, making it easier for you to loosen the bolt.
If you still can’t remove the bolts, then try spraying a little CLR on it. Try removing the bolts after a while. Sometimes the bolts get so tight and corroded that nothing seems to work. In this case, the only solution and option left lies in cutting them off using a blade.
Replace the gasket
You will have by now removed the tank bolts. There’s always the chance of the old and new nuts and bolts mixing up. Keeping them separate at the start can prevent it.
It is always better to also replace the gasket that you find outside the flush valve while replacing the tank bolts. It’s essential if your toilet is seven to ten years old or if you have a worn or hard gasket.
Once replaced, the gasket will anyway prevent water leakage between the toilet tank and bowl whenever you flush for at least a few years.
Installing new tank bolts

It’s now time to install the new tank bolts. Make sure the new bolts are the same type and size as the old ones. This is important because the bolts will cause eventual leakage if they are not the same size and style as the old ones.
Lift the tank off the toilet lid, guide the bolts through the toilet bowl, and mount holes until it sits on top of the bowl gasket. Make sure the tank covers the entire flush valve nut.
Line up the bolts with the proper holes. And if you are also replacing the gasket, place it on the tank bottom before proceeding to the next step.
Toilet tank bolts have rubber and metal washers for specific reasons. The rubber ones touch the tank body and give a leak-proof seal. They also absorb shock well to prevent possible cracking if the bolts get too tight.
While installing the bolts, first place a metal washer and then a rubber one on each bolt. Then push them through the holes to protrude on the bank bottom.
Now place a rubber washer and then a metal washer and nut on each bolt.
Start by tightening the bolt by hand, till snug, and then start using an adjustable wrench. However, do not over-tighten. You have to tighten the bolts alternatively to maintain the tank level on the bowl.
Many people make this mistake, thinking tight bolts will securely hold the tank and prevent future leakage. Little do they know that this only leaves you with a cracked toilet bowl or tank. If this happens, you will have to replace the entire bowl or tank.
Restore water supply
Now that all the bolts, nuts, and washers are installed, you next have to restore the water. Open the shut valve to let water enter and fill the tank.
You can watch and check the toilet tank sides, back, and the area around the bottom of the bow to see if the leak persists or has stopped.
You also need to flush a few times and see any leakage while the tank fills. It’s also better to check the area around the primary water connection. You know you have solved the problem if there is no leakage anywhere.
This is when you can replace the lid and use the toilet as usual.
The entire job of removing and replacing toilet tank bolts is a relatively easy one, needing about 30 minutes or an hour.
Toilet Tank Bolts Replacements in Toronto and GTA
By fixing the bolts you save money because you end up with a lower water bill and prevent possible floor damage because of the stagnant water.
If you do them yourself, there’s the risk of your making mistakes. Your mistakes may lead to more future expenses like buying a replacement tank because of a crack in it.
That’s why it’s always better to have a licensed and experienced plumber to handle the job. They have the experience and know-how to ensure the bolts are correctly replaced and do not spring a leak shortly.
For help in Toronto and surroundings, contact Dima Plumbing.


